Python: PIL to mp4

Posted: Friday, 10 July 2015

Why?

If you're having trouble piping image data frame-by-frame into FFMpeg (with the subprocess module), you may be interested in another way to convert python image data into a movie without having to store each individual frame as a file (whether it be .png, .jpg, .gif sequences).

However, this method is a little more complicated then attempting to get FFMpeg to work with python, so here's a little scenario to help with whether or not this tutorial is for you.

Let's say you're in a scenario, where you've encountered one of these errors:
"AttributeError: 'Popen' object has no attribute 'proc'"
"IOError: [Errno 22] Invalid argument"
and even
"IOError: [Errno 32] Broken pipe"

Either resulting from this tutorial: Read and write video frames in Python using FFMPEG - __del__( self ) or from some code elsewhere, and you are willing to use an alternative to ffmpeg to convert your PIL images to a video format like in this case: python - Piped FFMPEG won't write frames correctly - Stack Overflow, then read on.

If you're not willing to switch from FFMpeg to another alternative then press backspace and keep on searching!


How?

To do this, we're going to employ the assistance of OpenCV v2 and NumPy, which has been covered here: Python: Converting from PIL to OpenCV 2 Image Formats

Please note that the OpenCV version used is version 2, which uses
import cv2
as the import statement, as opposed to something like
import cv
There may be an update to OpenCV that breaks the code like with the answer found in the following link. image - Python JPEG to movie - Stack Overflow.
But without further ado, let's jump right into it!


Imports

We're going to be using PIL for loading and manipulating the images, NumPy for a PIL-to-OpenCV bridge, and OpenCV Version 2 for the actual image-to-movie process.
So our imports will look something like
from PIL import Image
import numpy, cv2


Manipulation

Obviously, the purpose of using python to convert from PIL to a movie is to be able to manipulate the image frame-by-frame using the power of PIL.
So here, I'm going to demonstrate some basic image blending functionality, just to provide a basis for this tutorial.

Here, we have two images, demo3_1.jpg and demo3_2.jpg...
demo3_1.jpg
demo3_2.jpg

With PIL, you can do something like

# Imports can be found in the "Imports" section above

# Load up the first and second demo images
image1 = Image.open("demo3_1.jpg")
image2 = Image.open("demo3_2.jpg")

# Create a new image which is the half-way blend of image1 and image2
# The "0.5" parameter denotes the half-way point of the blend function.
images1And2 = Image.blend(image1, image2, 0.5)

# Save the resulting blend as a file
images1And2.save("demo3_3.jpg")

In order to use PIL to blend two images together, in this case, the two images are blended at the halfway point, which means that half of each image is merged to become the resultant blended image.
demo3_3.jpg
This is a primitive version of an "additive blend", so you can think of it as an "additive frame blending using PIL" - note also that ImageChops isn't used for simplicity, but that's some additional power that you can use to manipulate images with.


Writing a video with OpenCV

With OpenCV, there's a "VideoWriter" method which you can access to create a movie with.
The method goes something like this:
video = cv2.VideoWriter(filename, codec selection, frames per second, (width, height))
Writing to the VideoWriter can be done with "video.write( numpy array as string )", and the VideoWriter can be "closed" by using "video.release()".

And that's all you need to know to convert from PIL to mp4 (or at least a movie, you need a certain codec for conversion to mp4).


All together now

With all the elements from the sections above in mind, here's the code in action
# Imports can be found in the "Imports" section above

# Load up the first and second demo images, assumed is that image1 and image2 both share the same height and width
image1 = Image.open("demo3_1.jpg")
image2 = Image.open("demo3_2.jpg")

# Grab the stats from image1 to use for the resultant video
height, width, layers =  numpy.array(image1).shape

# Create the OpenCV VideoWriter
video = cv2.VideoWriter("demo3_4.avi", # Filename
                        -1, # Negative 1 denotes manual codec selection. You can make this automatic by defining the "fourcc codec" with "cv2.VideoWriter_fourcc"
                        10, # 10 frames per second is chosen as a demo, 30FPS and 60FPS is more typical for a YouTube video
                        (width,height) # The width and height come from the stats of image1
                        )

# We'll have 30 frames be the animated transition from image1 to image2. At 10FPS, this is a whole 3 seconds
for i in xrange(0,30):
    images1And2 = Image.blend(image1, image2, i/30.0)

    # Conversion from PIL to OpenCV from: http://blog.extramaster.net/2015/07/python-converting-from-pil-to-opencv-2.html
    video.write(cv2.cvtColor(numpy.array(images1And2), cv2.COLOR_RGB2BGR))

# And back from image2 to image1...
for i in xrange(0,30):
    images2and1 = Image.blend(image2, image1, i/30.0)
    video.write(cv2.cvtColor(numpy.array(images2and1), cv2.COLOR_RGB2BGR))

# Release the video for it to be committed to a file
video.release()
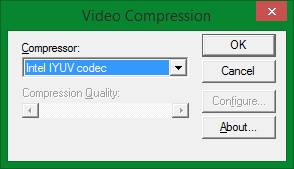
Note that when you run the code above, you'll get a prompt for codec selection...
It is possible to find a codec for direct .mp4 conversions, however here, the default "Intel IYUV" codec was chosen and used.

From this stage as well, you can use FFMpeg (outside of Python) or your favourite video conversion program to convert from the codec that you selected to the format that you want, which can indeed include .mp4 files... ImageMagick was used to convert the output to the gif below:


And that's it!


Note that this post was made specifically for OpenCV v2, as documentation online were frustratingly for OpenCV v1, which has different methods and such.

As a disclaimer, things might change in a newer version of OpenCV, so this information is correct as of July 2015.


Covered Topics:
PIL to mp4 conversion
PIL to movie conversion
PIL/Python/OpenCV Video file from Images
PIL/Python/OpenCV JPEG to movie
Creating an OpenCV movie from PIL images
Converting an OpenCV movie into PIL Images

Python: Converting from PIL to OpenCV 2 Image Formats

Code: opencvImage = numpy.array(PILImage)


Suppose you have an image that has been manipulated with the Python Imaging Library, and you want to convert that image into a format that can be understood by the OpenCV Version 2 Library.

To do that, as of OpenCV v2, you can use the NumPy array as an intermediary format between the two libraries, where NumPy can convert PIL data into the NumPy array format, and OpenCV v2 can recognize the NumPy array natively.

To demonstrate this conversion, here's some code.


# First you need to import the libraries in question.
import numpy
import cv2
from PIL import Image

# And then you need a PIL image to work with, for now, an image from a local file is going to be used.
PILImage = Image.open("demo1.jpg")

demo1.jpg
# The conversion from PIL to OpenCV is done with the handy NumPy method "numpy.array" which converts the PIL image into a NumPy array. opencvImage = numpy.array(PILImage) # Display the OpenCV image using inbuilt methods. cv2.imshow('Demo Image',opencvImage) cv2.waitKey(0) cv2.destroyAllWindows() # Which results in:
However, as you can see in the demonstration, the output OpenCV image turned a little weird, with the colour not matching the original PIL image (in the sense that the OpenCV image having the wrong colours). You can try this out for yourself...

This is because we're dealing with a multi-channel/"RGB" format and not a single channel image file, and a conversion from PIL to OpenCV involves a little bit of additional translation, this can be solved with OpenCV's "cvtColor" method.

Code: opencvImage = cv2.cvtColor(numpy.array(PILImage), cv2.COLOR_RGB2BGR)
To demonstrate this additional translation, here's some code.


# First you need to import the libraries in question.
import numpy
import cv2
from PIL import Image

# And then you need a PIL image to work with, for now, an image from a local file is going to be used.
PILImage = Image.open("demo2.jpg")

demo2.jpg
# The conversion from PIL to OpenCV is done with the handy NumPy method "numpy.array" which converts the PIL image into a NumPy array. # cv2.cvtColor does the trick for correcting the colour when converting between PIL and OpenCV Image formats via NumPy. opencvImage = cv2.cvtColor(numpy.array(PILImage), cv2.COLOR_RGB2BGR) # Display the OpenCV image using inbuilt methods. cv2.imshow('Demo 2 Image',opencvImage) cv2.waitKey(0) cv2.destroyAllWindows() # Which results in:

And that's it!
Note that this post was made specifically for OpenCV v2, as documentation online were frustratingly for OpenCV v1, which has different methods and such.

As a disclaimer, things might change in a newer version of OpenCV, so this information is correct as of July 2015.


Covered Topics:
PIL to NumPy conversion
PIL to cv2 conversion
PIL to OpenCV conversion
Adaptors.PIL2Ipl alternative/replacement/not working
Creating an OpenCV image from a PIL image
Converting an OpenCV image into a PIL Image

How to fix Microsoft Mobile Mouse Wheel Scrolling problems

Posted: Saturday, 27 June 2015

Table of Contents

Pre-solution

What didn't work

Dealing with the scrolling issues with the Microsoft Mobile 3500 Mouse turned out to be fairly simple, but


  • After plenty of messy registry hacks
    • (changing HCKU\Control Panel\Desktop\WheelScrollLinesHCKU\Control Panel\Mouse keys didn't work)
  • After plenty of time spent messing around with Control Panel
    • The basic "tutorials" only show you how to change the amount of lines scrolled at a time, but does not deal with the problem regarding the mouse scroll wheel sensitivity
  • After restarting/logging off a few times (logging off is apparently supposed to apply the registry changes that you've made)
  • And even after re-plugging the nano-transceiver device,


Nothing seemed to work to fix the delayed/slow scrolling with the Microsoft Mouse...

iOS 9 Feature Rip-Offs

Posted: Saturday, 13 June 2015

If you've watched the Apple WWDC Keynote for 2015, then you'll notice some of the new features that Apple introduced for iOS 9. If you're also a Windows Phone user, then you'll notice some blatantly obvious ripped-off features from WP8.1 in iOS 9.

So let's start.

The Notes App Rip-Offs

Link to the Notes section in the keynote
The iOS 9 notes app is mimicking the Windows Phone "OneNote" app as much as possible. But that's just an opinion - the recently introduced features reinforces this, but what's the point of complaining. Here's some actual content.

Mapping Sydney Universities

Posted: Tuesday, 19 May 2015

As a current university student, I've always had second thoughts about the university that I'm in. Of course, this is all natural for a first year indecisive undergrad, however even if I do decide to stay, it wouldn't hurt to go exploring other university campuses.

But where are all the universities hidden away in Sydney?

The University of Sydney (USyd)

Strategy Guide: Beating Agar.io

Posted: Friday, 1 May 2015

Table of Contents


Agar.io is an amateur clone of the popular game "Spore", featuring an online, real-time multi-player gameplay, where instead of facing off against the computer, you face off with real competitors from across the world.

Like with Spore, Agar.io is a dog eat dog world, yet with Agar.io - even the usernames of other players will be disgusting, containing the occasional cuss, self-promotion, and obnoxious Internet memes (such as a single Swastika). There will be players constantly and opportunistically stalking you, and players that will attempt to destroy you even if it means that they will be destroyed themselves.

In Agar.io, you start off as a small cell, collecting pickups and eating smaller creatures with a goal of growing larger and larger until you make it to the leaderboards. From the leaderboards, it's matter of trying to survive for as long as possible.

So how do you beat this game and get to the top of the leaderboard of your current "room"?

Strategy

Fixing Proxy/Loading Issues with the Windows 8 App Store

Posted: Monday, 6 April 2015

This is the Windows Store app. Or, at least it would be if it worked. For now, it's just a splash screen...

Well, if would still be a splash screen if it wasn't for the fact that after a long wait, an error message appears.

The one I got first was:

We weren't able to connect to the Store. This might have happened because of a server problem or the network connection might have timed out. Please wait a few minutes and try again. (0x80072ee2)

The next attempt in opening the store app resulted in another error:

We weren't able to connect to the Store. This might have happened because of a server problem or the network connection might have timed out. Please wait a few minutes and try again. (0x80190190)

Note how, in both cases, the error code was different...

So if you're currently encountering an error message with the same error codes, then you're in luck, since there is a fix! If the error code and problem is similar (but not exactly the same) then in any case just have a read through and see if your problem gets fixed.